

목차
13. 서비스의 인증과 권한 부여
ㄴ13.1 보안 용어 이해
ㄴ13.1.1 인증
ㄴ13.1.2 인가
ㄴ13.1.3 접근 주체
ㄴ13.2 스프링 시큐리티
ㄴ13.3 스프링 시큐리티의 동작 구조
ㄴ13.4 JWT
ㄴ13.4.1 JWT의 구조
ㄴ13.4.2 JWT 디버거 사용하기
ㄴ13.5 스프링 시큐리티와 JWT 적용
ㄴ13.5.1 UserDetails와 UserDetailsService 구현
ㄴ13.5.2 JwtTokenProvider 구현
ㄴ13.5.3 JwtAuthenticationFilter 구현
ㄴ13.5.4 SecurityConfiguration 구현
ㄴ13.5.5 커스텀 AccessDeniedHandler, AuthenticationEntryPoint 구현
ㄴ13.5.6 회원가입과 로그인 구현
ㄴ13.5.7 스프링 시큐리티 테스트
ㄴ13.6 정리
애플리케이션을 개발 시 인증과 인가 등의 보안 기능을 추가할 때가 있다.
스프링에 보안을 적용할 때 사용하는 Spring Security에 대해 알아보고 학습해보겠다.
여기서는 매 요청마다 토큰값을 활용하는 보안 기법을 알아볼 것이다.
13.1 보안 용어 이해
- 인증
인증(authentication) > 사용자가 누군지 확인하는 단계
인증의 대표적인 예 = '로그인'
데이터베이스에 저장되어있는 아이디와 비밀번호와 비교해서 일치 여부를 확인하는 과정이다.
로그인에 성공하면 애플리케이션 서버는 응답으로 사용자에게 토큰(token)을 전달한다.
로그인에 실패한 사용자는 토큰을 전달받지 못해 원하는 리소스에 접근할 수 없게 된다.
- 인가
인가(authorization) > 앞선 인증을 통해 검증된 사용자가 애플리케이션 내부에 리소스에 접근할 때 사용자가 해당 리소스에 접근할 권리가 있는지 확인하는 과정
인증 시 발급받은 토큰이 인가 내용을 포함하고 있기 때문에, 사용자가 리소스에 접근할 때 토큰을 함께 전달하면 애플리케이션 서버는 토큰을 통해 권한 유무를 확인해 인가를 수행한다.
ex > 로그인한 사용자가 특정 게시판에 접근해서 글을 보거나 쓰거나 하는 경우 게시판 접근 등급을 확인해 접근을 허가하거나 거부하는 것
- 접근 주체
접근 주체(principal) > 애플리케이션의 기능을 사용하는 주체를 의미
접근 주체 종류
- 사용자
- 디바이스
- 시스템
- 기타 등
애플리케이션은 앞서 소개한 인증 과정을 통해 접근 주체가 신뢰할 수 있는지 확인하고, 인가 과정을 통해 접근 주체에게 부여된 권한을 확인하는 과정을 거친다.
13.2 스프링 시큐리티
스프링 시큐리티 = 애플리케이션의 인증, 인가 등의 보안 기능을 제공하는 스프링 하위 프로젝트 중 하나
13.3 스프링 시큐리티의 동작 구조
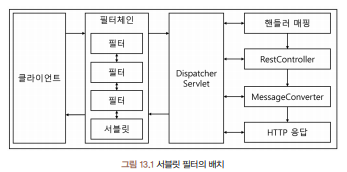
스프링 시큐리티는 서블릿 필터(Servlet Filter) 기반으로 동작한다.
참고로 WAS에서 실행된 요청이 서블릿으로 들어오는데, 서블릿에 들어오기 전에 처리를 해주는 것이 필터이고, 여러 필터들이 이어져있는 것이 필터 체인이다.
위 그림에서 클라이언트 -> 필터체인에서 필터체인(FilterChain)은 서블릿 컨테이너에서 관리하는 ApplicationFilterChain을 의미한다.
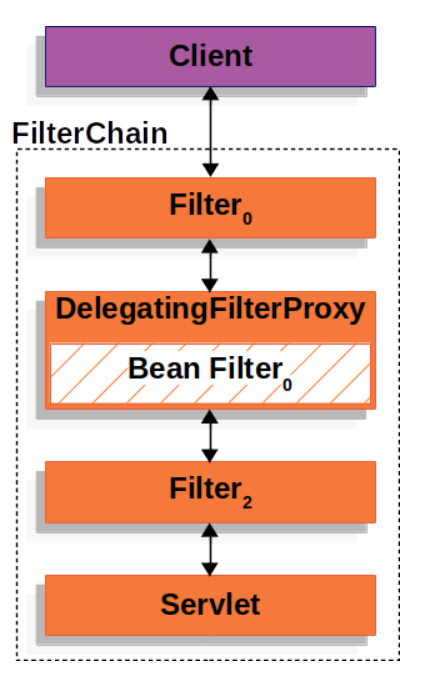
스프링 시큐리티는 사용하고자 하는 필터체인을 서블릿 컨테이너의 필터 사이에서 동작 시키기 위해서 DelegatingFilterProxy를 사용한다.
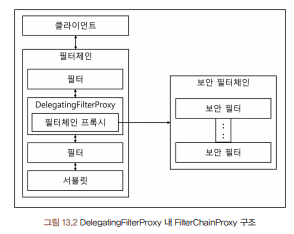
DelegatingFilterProxy : 서블릿 컨테이너의 생명 주기와 스프링 애플리케이션 컨텍스트 사이에서 다리 역할을 수행하는 필터 구현체
-> 필터는 Servlet 스펙에 있는 기술이라 Servlet 컨테이너에만 생성되고 실행되는데, 이것은 Spring loc 컨테이너와 다르고 호환이 되지 않는다. 그래서 Spring Bean으로 injection이 되지 않기 때문에 DelegatingFilterProxy가 Spring Bean에 요청을 위임하는 것이다(다리 역할)
-> springSecurityFilterChain 이름으로 생성된 빈을 ApplicationContext에서 찾아 요청을 위임한다. 실제로 보안처리하지 않고 위임만하는 Servlet Filter인 것이다.
DelegatingFilterProxy는 표준 서블릿 필터를 구현하고 있고, 역할을 위임할 필터체인 프록시(FilterChainProxy)를 내부에 가지고 있다. 이것은 스프링 부트의 자동 설정에 의해 자동 생성된다.
필터체인 프록시는 스프링 시큐리티에서 제공하는 필터로서 보안 필터체인(SecuirtyFilterChain)을 통해 많은 보안 필터(Security Filter)를 사용할 수 있고 List 형식으로 담을 수 있게 설정되어있다.
URI 패턴에 따라 특정 보안필터 체인을 선택해서 사용하게 된다.

보안 필터 체인은 WebSecurityConfigurerAdapter 클래스를 상속받아 설정할 수 있다.
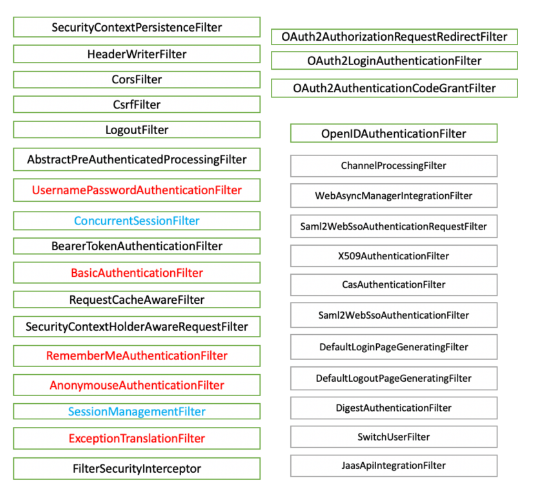
보안 필터 체인에서 사용하는 필터는 여러 종류가 있고, 각 필터마다 실행되는 순서가 다르다.
필터체인 프록시는 여러 보안 필터체인을 가질 수 있는데, 여러 보안 필터 체인을 만들기 위해서는 WebSecurityConfigurerAdapter 클래스를 상속받는 클래스를 여러개 생성하면 된다.
주의해야할 점
WebSecurityConfigurerAdapter 클래스에는 @Order 어노테이션을 통해 우선순위가 지정되어 있는데, 2개 이상 클래스를 생성 했을 때 똑같은 설정으로 우선순위가 100이 설정되어있으면 예외가 발생한다.
-> @Order 어노테이션을 지정해 순서를 정의하는 것이 중요하다.
별도에 설정이 없으면 스프링 시큐리티는 자동 설정으로 UsernamePasswordAuthenticationFilter를 통해 인증을 처리한다.

1. 클라이언트로부터요청을 받으면 서블릿 필터에서 SecurityFilterChain으로 작업이 위임되고, 그중 UsernamePasswordAuthenticationFilter(위 그림에서 AuthenticationFilter)에서 인증을 처리 한다.
2. AuthenticationFilter는 요청 객체(HttpServletRequest)에서 username과 password를 추출해서 토큰을 생성한다.
3. 생성한 토큰을 AuthenticationManager에 전달 한다. AuthenticationManager는 인터페이스고, 일반적으로 사용되는 구현체는 ProviderManager이다.
4. ProviderManager는 인증을 위해 AuthenticationProvider로 토큰을 전달한다.
5. AuthenticationProvider(s)는 토큰의 정보를 UserDetailsService에 전달한다.
6. UserDetailsService는 전달받은 정보를 통해 데이터베이스에서 일치하는 사용자를 찾아 UserDetails 객체를 생성한다.
7. 생성된 UserDetails 객체는 AuthenticationProvider로 다시 전달되고, 해당 AuthenticationProvider에서 인증을 수행하고 성공하게 되면 ProviderManager로 권한을 담은 토큰을 전달한다.
8. ProviderManager는 검증된 토큰을 AuthenticationFilter로 전달한다
9. AuthenticationFilter는 검증된 토큰을 SecurityContextHolder에 있는 SecurityContext에 저장한다.
스프링 시큐리티에 대한 공식 문서 : https://docs.spring.io/spring-security/site/docs/5.5.3/reference/html5/
Spring Security Reference
In Spring Security 3.0, the codebase was sub-divided into separate jars which more clearly separate different functionality areas and third-party dependencies. If you use Maven to build your project, these are the modules you should add to your pom.xml. Ev
docs.spring.io
13.4 JWT
화면 없이 백엔드 API(Restful API)로 프로젝트를 구현시에는 UsernamePasswordAuthenticationFilter이 아닌다른 필터에서 인증 및 인가 처리를 수행하면 된다.
이때 WebSecurityConfigurerAdapter를 상속받은 SecurityConfig에 해당 코드를 추가한다.
여기서 this.authenticationFilter는 JWT토큰 필터를 구현해주는 것이다.
@Override
    protected void configure(HttpSecurity http) throws Exception {

        http
                .addFilterBefore(this.authenticationFilter, UsernamePasswordAuthenticationFilter.class);
JWT란?
JWT(JSON Web Token) : 당사자 간의 정보를 JSON 형태로 안전하게 전송하기 위한 토큰
- 디지털 서명이 적용되어 있어 신뢰할 수 있다.
- 서버와의 통신에서 권한 인가를 위해 사용된다.
- URL에서 사용할 수 있기 때문에 HTTP 구성요소 어디든 위치할 수 있다.
JWT의 구조
JWT는 점('.')으로 구분된 아래의 세 부분으로 구성된다.

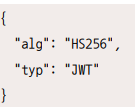
- 헤더(Header)
- 검증과 관련된 내용을 담고있음
- 두 가지 정보를 포함함.
- alg 속성
- typ 속성
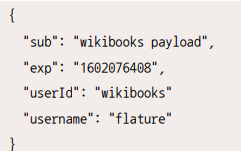
- 내용(Payload)
- 토큰에 담는 정보를 담고 있음
- 클레임이라고 함
- 세 가지로 분류됨
- 등록된 클레임(Registrere Claims)
- 공개 클레임(Public Claims)
- 비공개 클레임(Private Claims)
등록된 클레임 > 필수는 아니지만 토큰에 대한 정보를 담기 위해 이미 정해져 있는 클레임을 뜻한다.
공개 클레임 > 키 값을 마음대로 정의할 수 있으나 충돌이 발생하지 않을 이름으로 설정해야한다.
비공개 클레임 > 통신 간에 상호 합의 되고 등록된 클레임과 공개된 클레임이 아닌 클레임을 의미한다.
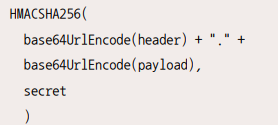
- 서명(Signature)
- 인코딩된 헤더, 인코딩된 내용, 비밀키, 헤더의 알고리즘 속성값을 담고있음
- 위 그림은 HMAC SHA256 알고리즘을 사용해서 서명을 생성한다는 의미
JWT에 관련된 자세한 내용은 공식 사이트에서 확인 가능 >
JWT.IO
JSON Web Tokens are an open, industry standard RFC 7519 method for representing claims securely between two parties.
jwt.io
13.5 스프링 시큐리티와 JWT 적용
1. 의존성 추가
spring-boot-starter-security-security
io.jsonweboken.jjwt
2. UserDetails, UserDetailService 구현
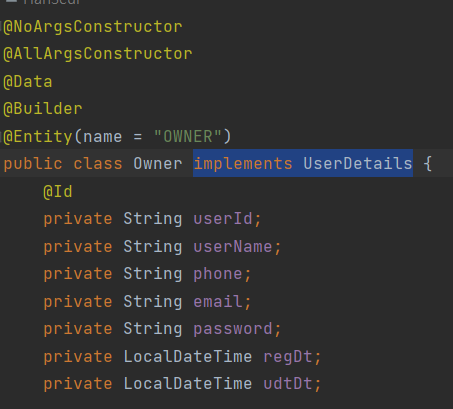

UserDetails 인터페이스를 구현하는 엔티티는 다음과 같은 메서드를 오버라이딩 해야한다.
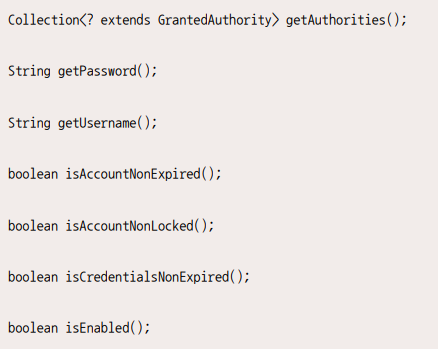
- getAuthorities() : 계정이 가지고 있는 권한 목록을 리턴한다.
- getPassword() : 계정의 비밀번호를 리턴한다.
- getUSername() : 계정의 이름을 리턴한다. 일반적으로 아이디를 의미함
- isAccountNonExpried() : 계정이 만료됐는지 리턴한다. true는 만료되지 않았다는 의미
- isAccountNonLocked() : 계정이 잠겨있는지 리턴한다. true는 잠기지 않았다는 의미
- isCredentialNonExpried() : 비밀번호가 만료됐는지 리턴한다. true는 만료되지 않았다는 의미
- isEnabled() : 계정이 활성화됐는지 리턴한다. true는 활성화 상태를 의미
UserDetailsService를 구현하는 Service도 가장 중요한 오버라이딩 메서드가 있다.
바로 loadUserByUsername(String username)이다.
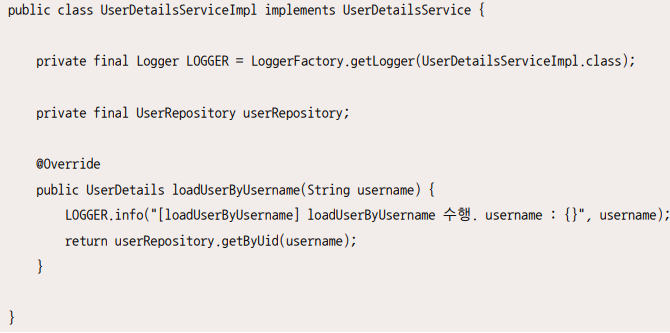
Repository는 평소처럼 JpaRepository 상속받는 Repository 인터페이스를 만들면 된다.
3. JwtTokenProvider 구현
JWT 토큰을 생성할때 필요한 정보를 위의 UserDetails에서 가져올 수 있다.
JWT 토큰을 생성하는 JwtTokenProvider를 생성한다.
토큰을 생성할 때는 암호화 할 secretKey가 필요하므로 application.yml이나 properties에 해당 값을 적어두고 @Value 어노테이션을 통해 가져오면 된다. 이때 깃헙에 올릴 때 보안에 유의하자.
@Component
public class TokenAuthenticationProvider  {
    public static final String TOKEN_HEADER = "Authorization";
    public static final String TOKEN_PREFIX = "Bearer ";
    private static final long TOKEN_EXPIRE_TIME = 1000 * 60 * 60; // 1 hour
    private static MemberService memberService;

    @Value("${spring.jwt.secret}")
    private String secretKey;


    /**
     * 토큰 생성(발급)
     * @param userId
     * @return
     */
    public String generateAuthToken(String userId) {
        Claims claims = Jwts.claims().setSubject(userId);

        var now = new Date();
        var expireDate = new Date(now.getTime() + TOKEN_EXPIRE_TIME);
        String token = Jwts.builder()
                .setClaims(claims)
                .setSubject(userId)
                .setIssuedAt(now) // 토큰 생성 시간
                .setExpiration(expireDate) // 토큰 만료 시간
                .signWith(SignatureAlgorithm.HS512, this.secretKey) // 사용할 암호화 알고리즘, 비밀키
                .compact();

        return TOKEN_HEADER+ TOKEN_PREFIX + token;


    }
    public Authentication getAuthentication(String jwt) {
        UserDetails userDetails = this.memberService.loadUserByUsername(this.getUserId(jwt));
        return new UsernamePasswordAuthenticationToken(userDetails, "", userDetails.getAuthorities());
    }
    public String getUserId(String token) {
        return this.parseClaims(token).getSubject();
    }

    public boolean validateToken(String token) {
        if (!StringUtils.hasText(token)) {
            return false;
        }

        var claims = this.parseClaims(token);
        return !claims.getExpiration().before(new Date());
    }

    private Claims parseClaims(String token) {
        try {
            return Jwts.parser()
                    .setSigningKey(this.secretKey)
                    .parseClaimsJws(token)
                    .getBody();

        } catch (ExpiredJwtException e) {
            return e.getClaims();
        }
    }
}
4. JwtAuthenticationFilter 구현
jwtAuthenticationFilter는 JWT 토큰으로 인증하고 SecurityContextHolder에 추가하는 필터를 설정하는 클래스이다.
@Component
@RequiredArgsConstructor
public class JwtAuthenticationFilter extends OncePerRequestFilter {

    public static final String TOKEN_HEADER = "Authorization";
    public static final String TOKEN_PREFIX = "Bearer ";

    private final TokenAuthenticationProvider tokenProvider;

    @Override
    protected void doFilterInternal(HttpServletRequest request, HttpServletResponse response, FilterChain filterChain) throws ServletException, IOException {

        String token = this.resolveTokenFromRequest(request);

        // token의 유효성
        if (StringUtils.hasText(token) && this.tokenProvider.validateToken(token)) {
            Authentication auth = this.tokenProvider.getAuthentication(token);
            SecurityContextHolder.getContext().setAuthentication(auth);
        }
        if (token != null) {
            log.info(String.format("[%s] -> [%s]", this.tokenProvider.getUserId(token), request.getRequestURI()));
        }


        filterChain.doFilter(request, response);
    }

    private String resolveTokenFromRequest(HttpServletRequest request) {

        String token = request.getHeader(TOKEN_HEADER);

        if (!ObjectUtils.isEmpty(token) && token.startsWith(TOKEN_PREFIX)) {
            return token.substring(TOKEN_PREFIX.length());
        }

        return null;
    }
}
5. SecurityConfig 구현
지금까지는 스프링 시큐리티를 적용하기 위한 컴포넌트를 구현한 것이고, 이제는 스프링 시큐리티에 관련된 설정을 진행하는 단계이다.
스프링 시큐리티를 설정하는 대표적인 방법은 WebSecurityConfigureAdapter를 상속받는 Configuration 클래스를 구현하는 것이다.
@Configuration
@EnableWebSecurity
@RequiredArgsConstructor
public class SecurityConfig extends WebSecurityConfigurerAdapter {
private final JwtAuthenticationFilter authenticationFilter;
private final AppConfig appConfig;
private final UserService userService;
private final OwnerService ownerService;
private final MemberService memberService;
@Autowired
private TokenAuthenticationProvider tokenAuthenticationProvider;
@Bean
UserAuthenticationFailureHandler getUserFailureHandler() {
return new UserAuthenticationFailureHandler();
}
@Bean
UserAuthenticationSuccessHandler getUserSuccessHandler() {
return new UserAuthenticationSuccessHandler();
}
private static final String[] AUTH_WHITELIST = {
"/swagger-resources/**",
"/swagger-ui.html",
"/v2/api-docs",
"/webjars/**",
"/h2-console/**"
};
private static final String[] AUTH_OWNERLIST = {
"/auth/owner/register/store",
"/auth/owner/delete/store",
"/auth/owner/update/store",
"/auth/owner/read/store",
"/auth/owner/reservation/**"
};
private static final String[] AUTH_USERLIST = {
"/store/reserve",
"/myreservation/**"
};
@Override
public void configure(WebSecurity web) throws Exception {
web.ignoring().antMatchers(AUTH_WHITELIST);
}
@Bean
@Override
public AuthenticationManager authenticationManager() throws Exception {
return super.authenticationManager();
}
@Override
protected void configure(HttpSecurity http) throws Exception {
http
.authorizeRequests()
.antMatchers(AUTH_OWNERLIST).hasAuthority("ROLE_OWNER")
.antMatchers(AUTH_USERLIST).hasAuthority("ROLE_USER")
.antMatchers(
"/**/signup"
, "/**/signin"
,"/store/all"
, "/store/search/**"
,"/find-password"
,"/reset/password").permitAll();
http.formLogin()
.loginPage("/auth/signin")
.failureHandler(getUserFailureHandler())
.successHandler(getUserSuccessHandler())
.defaultSuccessUrl("/auth/signinSuccess")
.permitAll();
http.logout()
.logoutUrl("/auth/logout")
.logoutSuccessHandler((request, response, authentication) -> {
SecurityContextHolder.clearContext();
response.sendRedirect("/auth/logout_success");
});
http
.httpBasic().disable()
.csrf().disable()
.rememberMe()
.disable();
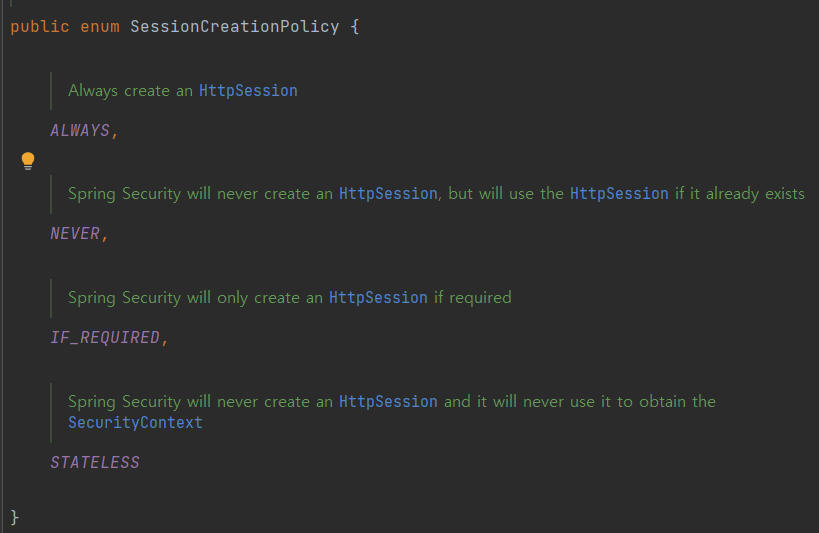
.sessionManagement()
.sessionCreationPolicy(SessionCreationPolicy.STATELESS);
http
.addFilterBefore(this.authenticationFilter, UsernamePasswordAuthenticationFilter.class);
http.exceptionHandling()
.accessDeniedPage("/error/denied");
}
@Autowired
public void configure(AuthenticationManagerBuilder auth) throws Exception {
auth.userDetailsService(memberService)
.passwordEncoder(appConfig.passwordEncoder());
super.configure(auth);
}
}
SpringSecurity는 WebSecurity와 HttpSecurity로 웹 보안을 구현하는데 이중 살펴 볼것은
HttpSecurity를 매개변수로 받는 configure 함수이다.
대표적으로 여기서 정하는 것은 다음과 같다.
- 리소스 접근 권한 설정
- 인증 실패 시 발생하는 예외 처리
- 인증 로직 커스터마이징
- csrf, cors 등의 스프링 시큐리티 설정
이때 코드에서는 JWT 토큰으로 인증 인가를 구현하기 위해서 SessionCreationPolicy를 STATELESS로 설정했는데,
타임리프와 같이 View를 같이 할때 주의해야한다.
로그인 후 해당 권한에 따라 다른 view(타임리프)를 보여주고 싶을때 SecurityContext에서 저장된것을 가져와야하는데
HttpSession을 만들지 않고 SecurityContext를 저장하지 않고 매번 reset된다.
이제 회원가입과 로그인을 스프링 시큐리티를 이용해서 인증과 인가 및 접근 주체에 맞게 구현할 수 있다.
엔티티를 잘 설정했으면 Dto도 그에 맞게 잘 설정해서 회원가입과 로그인 시 주고받는 객체를 Dto로 설정하고 엔티티를 회원가입에 맞게 저장하고 로그인할 때 데이터베이스에 해당 User가 있는지 일련의 인증 속에 권한을 갖게될 것이다.
이때 엔티티가 데이터 베이스에 저장될 때 비밀번호는 보안상 인코딩 된 상태로 저장되어야 하므로 PasswordEncoder를 활용해 인코딩을 수행한다.
따로 AppConfig 클래스를 만들어 Bean으로 등록시킨다.
@Configuration
public class AppConfig {
    @Bean
    public PasswordEncoder passwordEncoder() {
        return new BCryptPasswordEncoder();
    }
}
모든 서비스의 구현의 시작이 회원가입과 로그인이므로 스프링을 사용하는 이상 스프링 시큐리티와 친밀해지고 자주 사용해서 감을 익히고 여러가지 시도해보는 것이 좋을 것 같다.
'BookStudy > 스프링 부트 핵심 가이드' 카테고리의 다른 글
| [스프링 부트 핵심 가이드] 12 서버 간 통신 (1) | 2023.10.08 |
|---|---|
| [스프링 부트 핵심 가이드] 11 액추에이터 활용하기 (1) | 2023.10.08 |
| [스프링 부트 핵심 가이드] 10 유효성 검사와 예외 처리 (0) | 2023.10.01 |
| [스프링 부트 핵심 가이드] 09 연관관계 매핑 (0) | 2023.09.23 |
| [스프링 부트 핵심 가이드] 08. Spring Data JPA 활용 (0) | 2023.09.17 |